Home Theater PC
System hardware and software
Been thinking about building a home theater PC in order to be able to record
HD broadcasts and play Blu-ray discs.
The former can be easily accomplished using
Mythbuntu,
which is a version of Ubuntu Linux with integrated MythTV support.
(Note that Mythbuntu supports ACPI power management so it
can suspend to RAM to greatly reduce power consumption ,
then restore when recordings are scheduled.)
Blu-ray under Linux requires cracking, so
Windows 7 and commercial HD player software may be easier.
Unfortunately these two requirements are contradictory.
For hardware the following have caught my attention:
- GIGABYTE
GA-E7AUM-DS2H microATX mainboard
- Has on-board Nvidia GeForce 9400 GPU, HDMI and DVI
output jacks with HDCP copy protected outputs support for playing Blu-ray
content.
Seems an ideal combination and eliminates the need for a separate
video card. 9400 should be plenty fast enough for HD video playback.
9400 reportedly runs somewhat hot,
so a replacement heatsink could be useful.
Mainboard uses standard and common dual channel DDR2 800 PC6400 DRAM
with Intel Core 2 dual or quad processor.
It supports Front Side Bus rates at 800/1066/1333 and overclocking,
but for thermal survival 800 would be better.
Most importantly the 9400 has support for Pure HD, which means Blu-Ray
playback is fully-supported along with HDCP copy protection (under Windows)
via HDMI and DVI video outputs.
The 9400 also has
full
hardware offload for HD playback:
Breathtaking High Definition Video Playback
Experience full-spec playback of your favorite Blu-ray titles.
PureVideo HD offloads 100% of movie playback for all HD video formats
(H.264, VC1, MPEG-2), delivering stunning, stutter-free video with
outstanding audio fidelity.
which means that in principle a 1.8 GHz processor is enough.
Without hardware HD support, a 3+ GHz CPU would
reportedly be needed for HD playback.
See the Hardware section of the
Mythbuntu
installation manual.
- Antec
Minuet 350 case
- Compact microATX case with 350 Watt power supply, 1 external 5.25
drive bay for Blu-Ray / HD DVD drive, 1 external 3.5 inch bay for card reader,
1 internal 3.5 inch bay for hard disk.
The case is notably thin at under 4 inches and comes with feet for vertical
orientation like a very thin, small tower computer.
It can also sit flat like a desktop case, but would seem much better
thermally if vertically-oriented with the feet
so that the heat can rise and generate vertical airflow like a chimney.
It's also relatively small in depth and height,
so it's significantly smaller than a standard mini ATX small tower case.
One possible downside is that the Minuet uses a top-exit 80mm fan,
where a 120mm would be quieter but very difficult to fit into the case.
Additional ventilation is provided by the power supply fan,
also drawing air towards the top.
Note that the Minuet case has
low-profile PCI slots.
Full height PCI cards probably won't fit and low-profile slot
covers are probably also needed.
Fortunately the pcHDTV tuner card below is low-profile,
and it comes with a low profile slot cover also.
- pcHDTV HD-5500 HD tuner card
- A widely used video tuner card in (Linux) HTPCs.
Has support for U.S. analog (NTSC) and digital (ATSC) broadcast
and cable (QAM) video transmission formats.
This is a low-profile PCI card that should fit into the Minuet case.
Comes with a low-profile bracket and a full-height bracket too.
Cards from
Hauppague
would be used for other parts of the world.
- Western
Digital Caviar Green 1 TeraByte SATA hard disk
- Reportedly quiet and energy efficient.
- Microsoft Media Center Remote Control
- Widely-recommended.
Lots of Chinese clones are available, but they act like a mouse
and keyboard to the system and don't use lirc.
A popular-selling $15 model sold through Amazon
that claims Media Center compatibility is an Ortek VRC-1100
which apparently works perfectly with Windows, but requires some
key
remapping for MythTV.
Some of these remotes apparently act as both a mouse and keyboard
via two separate /dev/input s and
do make use of lirc.
See the wiki entry for the
Snapstream
firefly mini
in addition to the link
above for more info about how to manually configure these.
- Intel Wolfdale CPU
- Due to the GPU handling HD decoding on playback,
the CPU generally won't have much work to do.
This is especially true for recording HDTV which is already
encoded in digital format and essentially copied to hard disc in digital form.
The "Pentium Dual-Core" E5200 sells for about half the price of
a Core 2 Duo (E8xxx) of similar CPU clock rate,
but performs about the same at about the same 65 Watt design power.
The reason why? They're all Wolfdale 45nm chips.
The main differences between the current Wolfdale model lines
are 2MB versus 3MB or 6MB Level 2 cache
and 800 MHz versus 1066 or 1333 MHz FSB.
Here's a table comparing the E5xxx, E7xxx and E8xxx
Wolfdale cache and FSB:
| CPU model number |
L2 cache |
FSB |
| E5xxx |
2 MB |
800 MHz |
| E7xxx |
3 MB |
1066 MHz |
| E8xxx |
6 MB |
1333 MHz |
Given that very few people attempt to use hot-running,
expensive memory faster than the much more common 800 MHz DDR2,
the 1066 or 1333 FSB capability is largely irrelevant.
Using 800 MHZ memory with an 800 MHz CPU FSB is ideal since
they're correctly matched at the same clock rate.
Using 800 MHz memory with a 1333
or 1066 capable CPU FSB generally means running the FSB at 800 MHz
anyway in order to match the memory, so there's no benefit from
the theoretically faster FSB.
So the main potential difference other than cost is the smaller L2 cache,
which is very likely unnoticeable in this application.
Case thermal design comments
May I complain again that the thermal management on desktop PCs is
generally terrible.
They generally blow hot air around in random directions,
often just recirculating hot air inside the case
instead of removing it from the case directly and efficiently.
Current high-performance video cards are an exception,
since they follow the original Arctic Cooling
design that correctly takes the heat from the GPU and vents it
directly out of the back of the case through the slot covers.
In contrast, servers have a
strict, consistent cooling airflow direction, usually front to back,
that the hard drives, RAM, processors, and cards all follow.
Blade and backplane servers and communications chassis like
routers and switches often have bottom-to-top airflow
direction if the backplane and blades are vertical,
but again the airflow is strictly in one direction.
This is how professional thermal engineers design
cooling airflow.
Similarly to most desktop cases,
the Antec Minuet 350 has very confused thermal management.
It has two fans that both pull air upwards when used in a tower
configuration.
The 80mm case fan vents air out the top.
The power supply also pulls towards the top,
but has a small vent to the front
which is wrong if it provides a path for hot air
to go towards the front of the case.
All that would do is heat up the things in front and
recirculate the hot air to get it hotter inside the case.
The front outlet also sends hot air to the top case exhaust fan
which decreases the case fan effectiveness.
The case has minor venting around the front bezel,
a large grille stamped into the side cover
over the CPU/GPU area of the main board,
a large open grille over the slot covers,
and a somewhat ineffective row of cooling air
input slots along the bottom of the side cover.
All in all, the airflow seems confused and inconsistent.
It's probably meant to be used with a CPU cooler that pulls air down from the
grille in the side cover, which would then blow hot air over the GPU,
up to the power supply and also out the top chassis fan.
Neither RAM nor the hard drive or optical drive are particularly well-cooled
though they have air around them and some minor airflow.
OTOH the case needed to be useable either in tower or horizontal mode,
so the requirements are somewhat conflicting.
Remembering that air will take the path of least resistance,
if we want to convert this case to passive CPU and GPU coolers,
an air shroud will be needed.
Without a shroud, the air will just get pulled directly into the fans
and largely bypass the heatsinks which will offer more resistance
to the flow of air.
Server cases often have a shroud over the front fans and RAM and CPU
to force air over them before washing cooling air over
the rest of the components towards the back of the case.
We can copy this idea here, but in a different direction.
Given the existing fans,
the only useable airflow direction with
GPU and CPU passive coolers would be for
the shroud to direct air over them and up into the power supply.
The case fan is too far
forward to reach those heatsinks.
The shroud will encourage the airflow to the case fan to go
over the RAM and drives at the front of the case.
The upward direction is good since this is a tower case where hot air
naturally wants to rise to the top of the case and cool air would
ideally come in from the bottom of the case.
Mini howto and notes on setting up this system
In order to set up the system and get it working,
the following were necessary using the hardware above
with Mythbuntu 9.04 as of August 2009.
Some of the following is from memory so it may be
somewhat fuzzy.
Unusual or board-specific requirements are in bold.
- IMPORTANT: DO NOT HOT PLUG THE HDMI CABLE TO THE
TV OR COMPUTER OR LEAVE IT DANGLING. SUPPOSEDLY THIS CAN
BURN OUT THE HDMI INTERFACE SINCE IT'S A POWERED INTERFACE.
POWER DOWN ALL EQUIPMENT FULLY BEFORE PLUGGING OR UNPLUGGING
ANY HDMI CABLES.
- I installed the Mythbuntu ISO from USB flash drive,
putting it on the flash using Unetbootin.
A CDROM would also work of course.
- Have a working Internet connection, Ethernet or wifi.
Hardwired is generally easier. MythTV needs to
install with a TV schedule data source, software update
access, etc.
- Sign up for a TV schedule data service such as
Schedules Direct.
- Configure a "lineup" in the schedule data service that
defines what channels you'll be using. If not, there will be
no channels defined for your user account and MythTV's use of it.
Delete from your lineup any channels that are
not actually available in your area.
- Have a working video signal source connected, such as TV antenna, cable,
satellite.
- Have a monitor or HDTV connected.
- During Mythbuntu setup, choose the
"proprietary" Nvidia driver and not the much older open
source one included in Mythbuntu. I think it was version 180.44 .
The choice of Nvidia video driver is one of the few
major configuration options.
- Adjust the TV screen setup from the setup menu, if the
MythTV graphics seem cut off around the edges.
The arrows mentioned don't look anything like arrows, more
like grey triangles in the upper left and lower right corners
with almost no contrast difference between the grey triangles
and background wallpaper. Use the arrow keys to move
the triangles until the white lines start to appear then back
off till they disappear.
I believe enter or tab toggles between the upper and lower
triangles, and the "M" key selects the menu option that lets
you save the settings.
- Configure MythTV to use the tuner hardware. For the
hardware above, it's called something like "DVB DTV".
Look for the pcHDTV 5500 name to appear when you select that.
- Configure MythTV to use the TV schedule data source.
- Disable "Onboard audio" in the BIOS. This disables the S/PDIF
(IEC958) output. Apparently the system can only output two audio
streams at a time, from HDMI, S/PDIF, analog.
This is an unusual and underdocumented requirement.
I confirmed that HDMI audio does not work when Onboard Audio is
enabled in the BIOS, so it seems that only one can be used at
any given time.
This is sort of ok since AV systems are moving towards
audio via HDMI, though many people still have S/PDIF receivers, etc.
- I had to update the ALSA sound system in order to
make HDMI sound work with this board.
I used this
alsa update script,
but edited references from 1.0.19 to the current 1.0.20 version.
The final stage of the script essentially does nothing when you
hit "1" for "auto". That's ok. Just exit at that point.
"auto" is the default so nothing actually needs to be changed.
(The ALSA update is probably needed because
the sound card software that ships with the operating
system and/or the mythtv fork of it lag by much of a year,
so recent hardware such as this Gigabyte board may not be
in the sound configs.
Sound hardware is probably more specialized and changes more often
than video hardware.)
- To get HDMI digital audio output working with MythTV
for this board,
go to Utilities/Setup -> Setup -> General.
On the third screen set the Digital audio output to
ALSI:hdmi
by manually typing that after hitting enter in that field.
There is also a selection for ALSA:spdif .
- I did not need to set up an /etc/asound.conf in order to
make HDMI audio work.
- The stock Intel CPU fan is probably the noisiest part of the system,
followed by the power supply fan.
I replaced the CPU cooler with the larger one mentioned below.
Also considered trying to do a passive CPU cooler (fanless),
but may not be safe enough in an appliance-type computer.
- The WD green hard drive is very quiet, but makes a "clunk"
in the case when doing a head seek. Generally the hard drive
is much quieter than the fans and probably not noticeable.
- I replaced the stock Antec TriCool 80mm fan with
an
Arctic Fan 8 PWM fan paralleled with the CPU
fan and feeding the system fan RPM header on the mainboard.
Arctic Cooling fans are very quiet, especially the ones with
open frames, isolation mounts and PWM for slower speeds like
the 8 PWM.
It's mounted at the top of the case and pushes hot air out the top.
- I replaced the stock Intel CPU cooler with an
Arctic
Cooling
Alpine 11 Pro. It's designed for 95 Watts which is much more
power than the 5300, so it's significantly larger than stock
and runs very cool at this CPU's lower power levels.
It fits in the case nicely since it's pure aluminum and has no heat pipes.
It's also much quieter than the stock cooler, with noise barely
perceptable when an ear is right next to it.
For all practical purposes, it's silent.
Any fan is going to be louder than a passive cooler,
but the fan turns slowly most of the time,
and having a variable speed fan is good protection
against overheating on a hot day.
The fan has an open frame and is suspended in rubber mounts
which any isolate vibration.
- I replaced the smallish stock 9400 passive (fanless)
chipset GPU heatsink with
a Thermaltake "CL-P0444 AMD Quiet CPU Cooler"
that was on closeout at Frys for about half price at $6.90.
This cooler was apparently designed to quietly cool a low end
AMD Athlon CPU, thus the fairly low heat capacity and wide fin spacing.
Its unusually wide fin spacing (maybe 5 mm fin pitch)
is good for this passive cooling application.
(I removed its fan.) For passive cooling
wide spacing of the fins is needed due to the lower air resistance
faced by slower-moving, natural air convection.
For fan-based cooling, closer fin spacing is better since
air is actively forced through them.
I used thermal epoxy to glue it onto the chip and had to saw off
about a half inch of the fins to make it clear the CPU cooler.
The other end of the heatsink does block the top two mainboard
slots, but it's very unlikely they will ever be used. This is a
dedicated HD DVR and the tuner card is the only slot used.
- I thermal epoxied a small chip cooler onto the exposed chip
on the tuner card. The cooler feels hot so it's doing some good.
Probably not necessary, but may help the chip run a bit cooler.
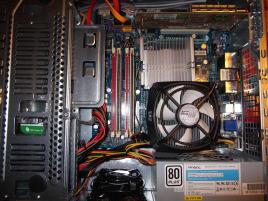
In the image above, you can see the Alpine 11 Pro CPU cooler
above the power supply, and
the now-passive Thermaltake cooler on the 9400 GPU/Northbridge above the CPU.
The Alpine 11 is as tall as the power supply and fits in the case
with not much room to spare. The Thermaltake is about half as tall,
but still much larger in all dimensions than the original cooler.
The Arctic 8 PWM replacement case fan is at the bottom of the picture.
(The bottom of the picture is the top of the case; it's upside down.)
The tuner card is towards the top.
The Hard drive is at the left, which is the front of the case,
and the back of the case is at the right.
(Click on the image to get the larger image.)
See also the updated notes on installing a later version of
Mythbuntu below.
Temperatures and power
For 25C room temperature,
measured using uncalibrated non-contact IR thermometer,
soon after opening the case after watching playback for a while:
| Stock CPU heatsink |
33C (stock Intel cooler is cool but noisy fan) |
| Stock GPU heatsink |
47C (stock mainboard heatsink) |
| Modified CPU heatsink |
26C BIOS reported (Arctic Cooling Alpine 11 Pro) |
| Modified GPU heatsink |
38C BIOS reported (Modified Thermaltake AMD CPU cooler) |
| rear DRAM stick |
40C |
| front DRAM stick |
45C (probably less airflow) |
| Hard disk |
33C (WD Green 1TB is surprisingly cool,
possibly
too cool per Google hard disk failure report) |
| Tuner card |
45-55C (some hotspots) |
Tuner card runs surprisingly hot, so I moved it from the lower PCI slot
to the upper one, for possibly better air cooling.
Power consumption measured using uncalibrated
Kill-A-Watt:
| Idle |
47W |
| MythTV menu |
49W |
| Full HD Recording |
51W |
| Full HD Playback |
54W |
| Watch HD TV |
67W (includes recording since MythTV records live TV) |
This is without aggressive CPU throttling,
spinning down idle hard disk, etc.
Given how hot the tuner card runs,
it would probably be useful to depower it too when it's not needed.
However the much better solution is
to
shutdown
the entire system and wake it when
it's needed for recording using ACPI.
See also
MythTV Power saving.
2014 Update: Quick notes on installing Mythbuntu 12.03.4
This is the September 2013 version of Mythbuntu; notes from 12/30/2013
Main installer
- Use unetbootin to transfer Mythbuntu 12.03.4 installer
ISO onto USB flash drive.
- Boot the installer, select "install"
- Select "Download updates while installing"
- Select "Install third party software"
- Select Erase and Install option (caution: erases hard disk!)
- Select default drive usage
- Create user, and select "log in automatically",
else requires manual keyboard login upon every system boot!
Do set a password; this is also used for sudo later.
- Select Frontend and Backend option, assuming will use local front end
- Services: select: ssh,
samba (if want to share/play files outside this system),
mythtv (for remote mythtv client front end, not needed if combined
frontend/backend is the only formal client on the LAN).
(Mythweb, the remote web interface used to set recording schedules,
download recorded programs, etc.,
appears to be installed by default, and is not the same as the
mythtv client.)
- No remote control support needed since my remote is like a mouse device
(if using real remote control, will need to configure it)
- Select the Nvidia driver (default driver tends to be very old version)
Post install configuration
- Reboot after install, removing flash drive when safe,
escape out of Myth front end application
- On desktop, right click, start network configuration application,
set static IP. Try to make it static in router DHCP config.
(This is under: Applications -> Settings -> Network Connection)
- On desktop, start Myth Backend Setup application.
MUST stop the Myth backend
(This is under: Applications -> System -> Mythtv Backend Setup)
- Under General, set the static IP from above
for Local Backend and Master Backend
(oddly default 127.0.0.1 may not work, but probably should).
Update: after upgrading in place to 12.04.5 HWE
due to EOL,
the static IP no longer seems to work, but 127.0.0.1 works.
Had to change back to the original default of 127.0.0.1 in both places.
In other words, new installationss should be able to use the defaults here.
- Also under General, set "Automatically update program listings"
or they don't ever update
(This is a dumb default!
A DVR is nearly useless without current TV program listing data.)
- Also under General, usually the last page called
"Program Schedule Download Options", if using SchedulesDirect
must set the "Guide data arguments" to: --dd-grab-all .
If this is not set, the schedules eventually get out of sync and
start missing days. Reference
[mythtv-users]
Mythfilldatabase not adding new data.
- Under Capture Cards, select new capture card, select DVB DTV,
notice PCHDTV tuner card being shown
- Under Video Sources, select new, type name "SchedulesDirect",
enter username and password, then select "retrieve lineups"
to populate lineup data from listing provider
- Under Input Connection, select set video source to SchedulesDirect
- Also under Input Connection, select "Scan for Channels"
(uses tuner card to actually find broadcast channels,
as opposed to using data provider's notion of local channels).
Takes a few minutes to scan.
- Accept the found channels, including conflicting ones,
then edit out the conflicting channels, which are usually duplicates
(could also ignore the duplicates instead)
- Under Channel Editor, delete any unwanted channels
(probably won't be recording Home Shopping Network, etc.)
Navigate the channels using the up and down arrows on the
keyboard or remote control.
Hit the "m" key for Menu, to delete specific channels.
There is also meant to be a "menu" button on wireless remotes.
(The "m" for Menu key is also needed when editing certain aspects of
recording schedules from the MythTV front end GUI.)
- When exiting the Channel Editor, allow the program to accept
the channels, even if the numbering doesn't match the lineup.
For example, my lineup starts with 1-1, but I deleted all the 1-*
channels, so the tuner and lineup first channels won't match.
Select the option that says this is ok;
something like "no, I know what I'm doing".
(The message language is somewhat unclear.)
It's probably intended to be a bounds check.
- Exit configuration application,
restarting Myth backend and running mythfilldatabase
Audio and video worked by default, which is a good sign,
but note that it's with the BIOS hardware settings configured above in
earlier installations. In general installation went smoothly,
but there are some probably dumb defaults, and more could be automated
or default configured. No way could a non-geek average consumer
do the above. Compare this to a commercial DVR appliance,
which basically works out of the box. These are areas where
open source generaly lags behind commercial/consumer products.
2014 Update 2: Installing Mythbuntu 14.04.1
Notes from September 2014:
Installation is similar to 12.03.4 above.
Seems crashy, possibly due to X problems.
Update: the recent Nvidia propietary drivers may be
unstable
with some motherboard integrated video chips, such as the 8200 and
apparently also my 9400.
Therefore I am changing from the Nvidia proprietary to the open source driver.
I generally do not use the video front end anymore so this should be ok.
It would not be ok for people who actually use the Mythtv box as a front end
to their TVs, i.e.,
use it to watch videos as a DVR directly connected to their TV,
which is a typical use. Notes say:
"Note: As of driver 177.80, this problem persists,
and is not fixable, on the integrated GeForce 8200 GPU.
The issue may or may not be fixed in later revisions."
2014 Update 3: Downgrading to Mythbuntu 12.04.4
14.04.01 kept crashing on me, even with the open source video
driver, so I'm downgrading to 12.04.4.
So far, 12.04.4 seems very stable, as was 12.03.4.
